Hello FollowFox Community!
This is part 2 of the ComfyUI series, where we started from an empty canvas, and step by step; we are building up SDXL workflows. The goal is to build up knowledge, understanding of this tool, and intuition on SDXL pipelines.
Here is the rough plan (that might get adjusted) of the series:
This is part 2 of the ComfyUI series, where we started from an empty canvas, and step by step; we are building up SDXL workflows. The goal is to build up knowledge, understanding of this tool, and intuition on SDXL pipelines.
Here is the rough plan (that might get adjusted) of the series:
- In part 1 (link), we implemented the simplest SDXL Base workflow and generated our first images
- Part 2 (this post)- we will add SDXL-specific conditioning implementation + test what impact that conditioning has on the generated images.
- Part 3 - we will add an SDXL refiner for the full SDXL process
- Part 4 - this may or may not happen, but we intend to add Controlnets, upscaling, LORAs, and other custom additions.
Conditioning in SDXL
In the SDXL paper (link), we observe a few significant changes compared to the previous Stable Diffusion versions. Three of these changes fall into so-called conditioning categories. To oversimplify, during the model's training process, some information about the dataset and particular images was passed to the model on top of the usual prompt and the image itself.
This can have massive implications because now that the model is trained during the inference process (during the image generation process), we can pass these additional conditioning parameters, which can significantly impact the output. In a way, by adding these values, we are pointing the model to a certain subset of the original image dataset, and one can argue that there are possible combinations of parameters and prompts that work particularly well or poorly. Without further experimentation and a closer look at the original dataset, it can be quite difficult to ding these optimal combinations.
Some initial guidance from Stability AI would have been useful for the community.
Let’s quickly do an overview of these three conditioning approaches:
- Image Size - instead of discarding a significant portion of the dataset below a certain resolution threshold, they decided to use smaller images. However, image size (height and width of the image) is fed into the model.
- Cropping Parameters - during the training process, some cropping happens as not all aspect ratios are supported. So when there is an image with an unsupported aspect ratio, the longer side of the image is randomly cropped to fit the desired size. In this process, some important image parts can be cropped out (the top part of the face, for example). To address this, during the training process, the cropping values were fed to the model, and it’s mentioned in the text, during the inference, setting the crop to (0,0) fixes most of the issues that crop typically introduces.
- Aspect Ratio (bucket size) - finally, SDXL was fine-tuned on various aspect ratio images. The images were bucketed into some number of supported aspect ratios, and during the training, the values of these buckets were fed into the model. So, in theory, we should match the aspect ratio of the target image and this conditioning value during the image generation. Still, also, there is a chance, that we will discover some interesting combinations that violate this rule.
With all this context, let’s add these parameters to our ComfyUI workflow.
Implementing Size and Crop Conditioning
We will start right where we left off in part 1 (link). Make sure to read part 1 before proceeding here. Your starting workflow should look like this.
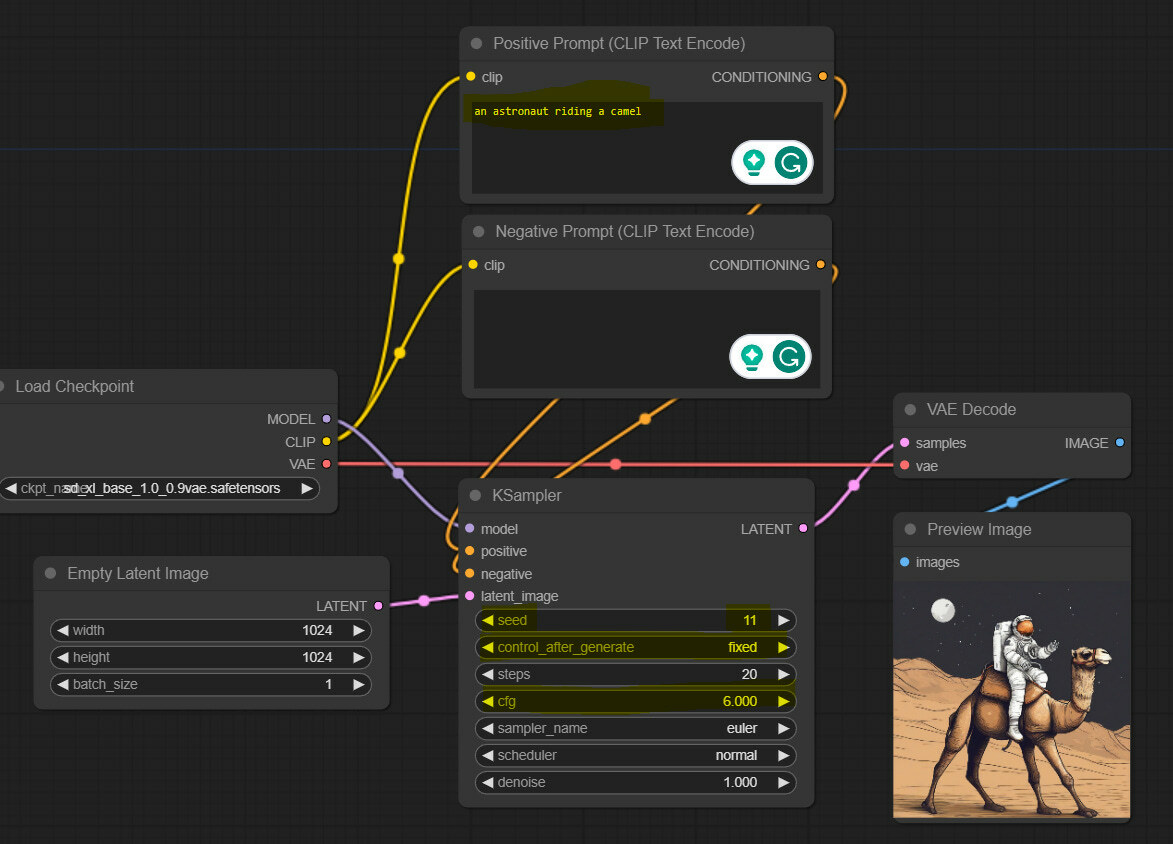
If you need to load it, download and drag the following image on your ComfyUI canvas, which will load automatically (direct link).
As discussed a bit earlier, we need to add a way to tell SDXL the image size values (this is not the output size but an input used for generating the image) and values for the crop size of the image.
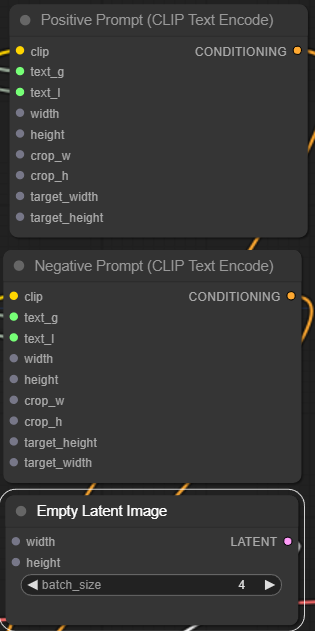
Doing so in SDXL is easy; we must replace our Positive and Negative prompt nodes with special, newer, SDXL specific ones.
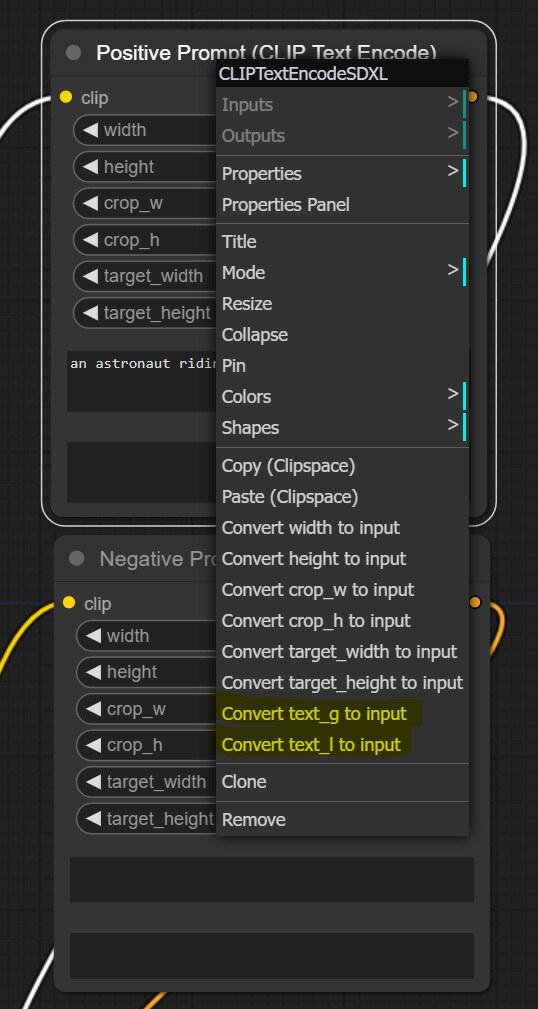
To do so, right-click on the canvas, press Add Node > advanced > conditioning > CLIPTextEncodeSDXL.
Doing so in SDXL is easy; we must replace our Positive and Negative prompt nodes with special, newer, SDXL specific ones.
To do so, right-click on the canvas, press Add Node > advanced > conditioning > CLIPTextEncodeSDXL.

Let’s take a look at this node.
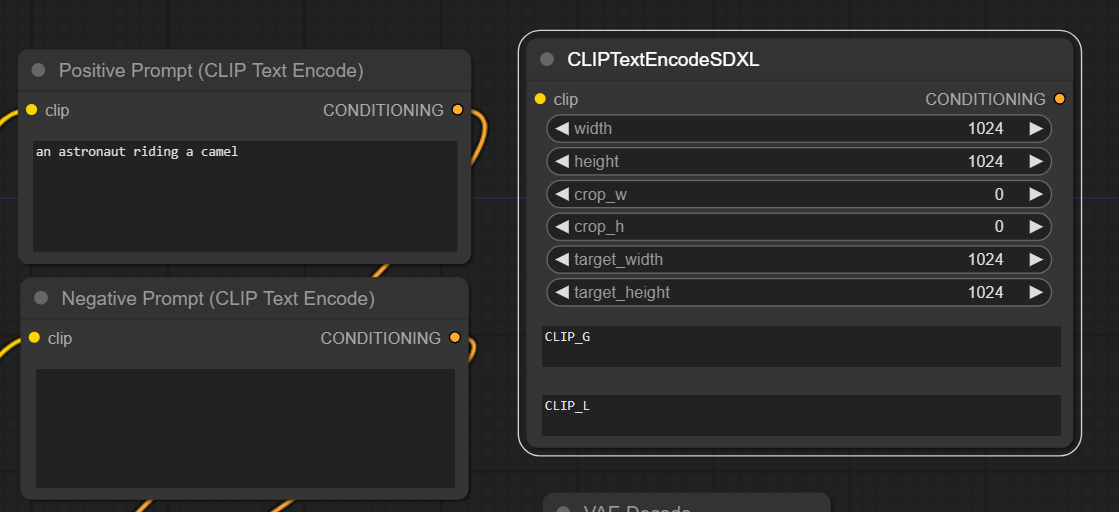
- Like the previous text encoding nodes, it has one left-hand side yellow input slot, “clip,” and one right-hand side orange output slot, “CONDITIONING.” We will connect our model loader and KSampler to these in a bit.
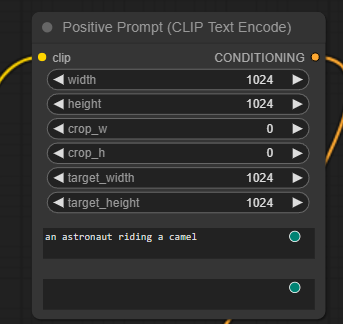
- We also see six new input widgets: width and height (this should be conditioning image size values), crop width and height (crop conditioning), and, finally, target width and height (representing bucket size based on the aspect ratio buckets used)
- Finally, we have CLIP_G and CLIP_L text input widgets. G and L represent two text encoders that SDXL uses, OpenCLIPViT-bigG and CLIPViT-L. Strangely, we can input the text for the two separately, but this is where your prompts will go, and we suspect we have to put an identical prompt in both places. We will test this in a bit.
Now that we know what to expect from this node let’s connect this to our workflow. You can follow these steps:
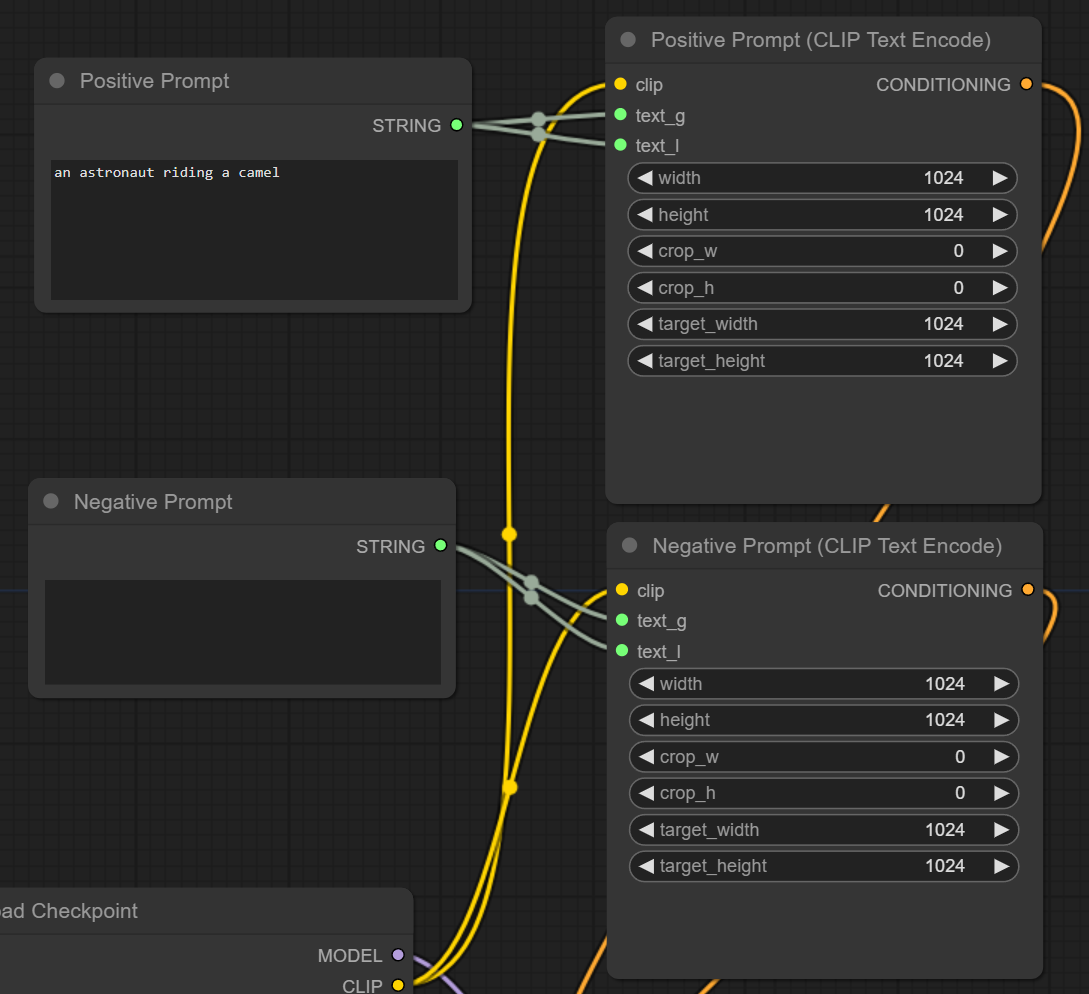
- Create another CLIPTextEncodeSDXL node by: Add Node > advanced > conditioning > CLIPTextEncodeSDXL
- For clarity, let’s rename one to “Positive Prompt” and the second one to “Negative Prompt.” You can rename a node by right-clicking on it, pressing the title, and entering the desired text.
- Delete older positive and negative prompt nodes.
- Connect all four vacant slots: left-hand side “clip” slots to the “CLIP” node on Load Checkpoint; right-hand side “CONDITIONING” slots to the “positive” and “negative” slots on KSampler accordingly.
That’s it! In the end, your updated workflow should look something like this:

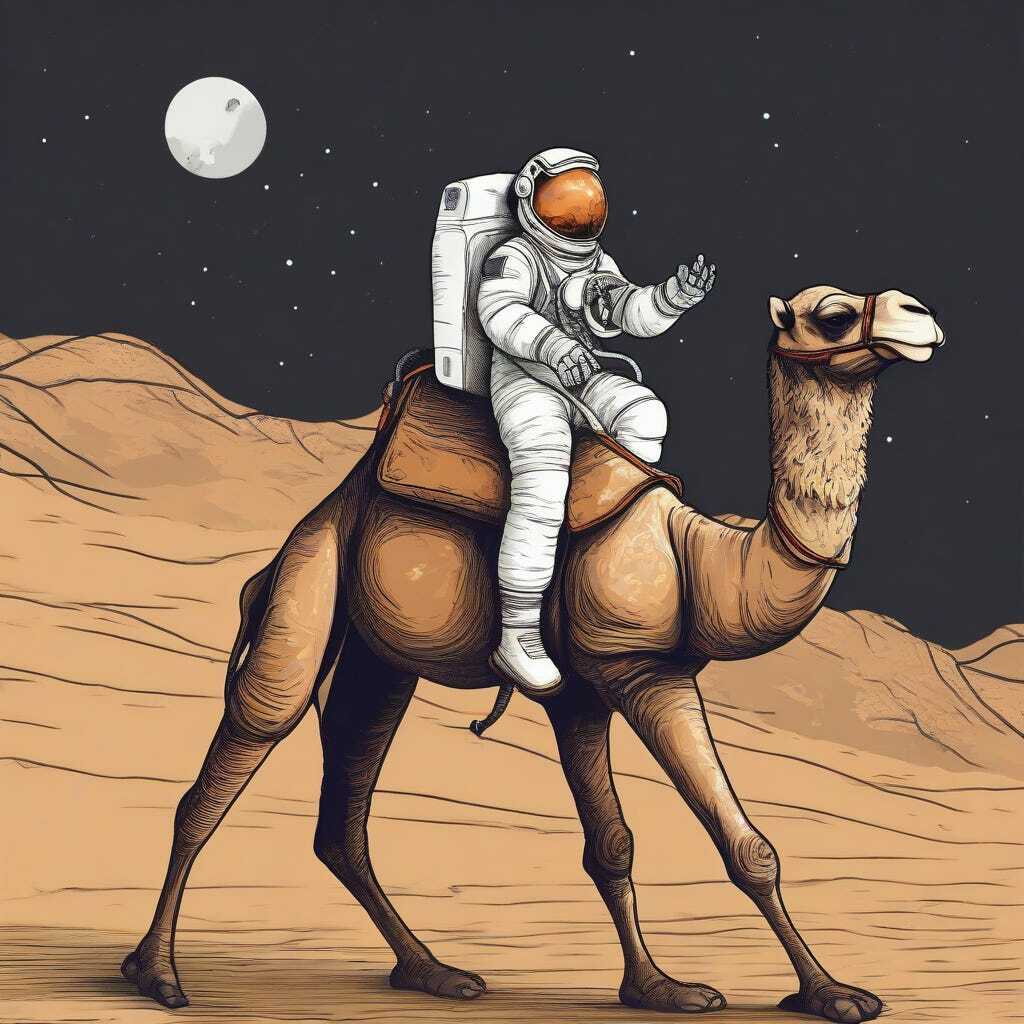
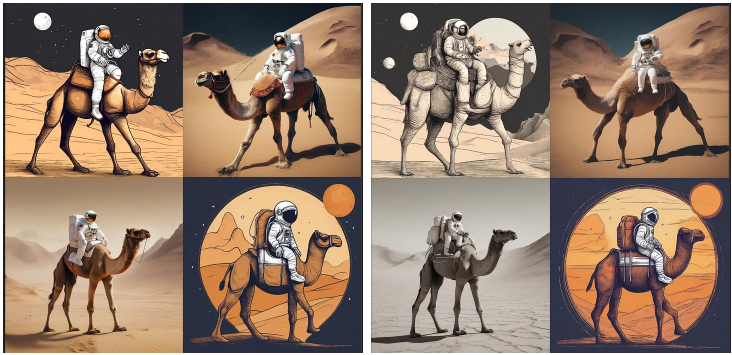
Time to test it. To generate the same image, in a positive prompt, we write “an astronaut riding a camel” for both inputs and leave both negative prompt entries empty. Hit generate, and we got the same (almost exact?) image as before:

So we can say that adding conditioning with standard values does not impact the generated images.
Now let’s experiment a bit with the new levers.
Experiments with CLIP_G and CLIP_L Prompt Inputs
From the SDXL paper (link), we read that SDXL uses a combination of two text encoders:
Specifically, we use OpenCLIPViT-bigG in combination with CLIPViT-L, where we concatenate the penultimate text encoder outputs along the channel-axis.
To put it simpler, after you input your prompt, there are two separate models, each of which will convert your text into specific format numbers. Then these numbers are added to each other (concatenated) and passed in this form to the UNET.
As we saw earlier, ComfyUI implementation gives the option to input text separately for each of the two models (at least, that’s how it looks on the interface, unsure what happens in the code). So let’s see some different combinations.
Input only in CLIP_G
So this is how we are doing this.
As we can see, it definitely has an impact, and we got a somewhat different image.

It definitely looks worse, so to ensure it’s not a seed rng, let’s compare 4 images with both prompts (left) and CLIP_G only (right).
We can see worse performance across all images.
Input only in CLIP_L
Let’s do the same with CLIP_L only.
We see even worse degradation, so using both in tandem is the way to go!
Different Prompts for CLIP_L and CLIP_G
Let’s see what happens if we alter prompts slightly between the two.
CLIP_G input: “an astronaut riding a pig”
CLIP_L input: “an astronaut riding a camel”
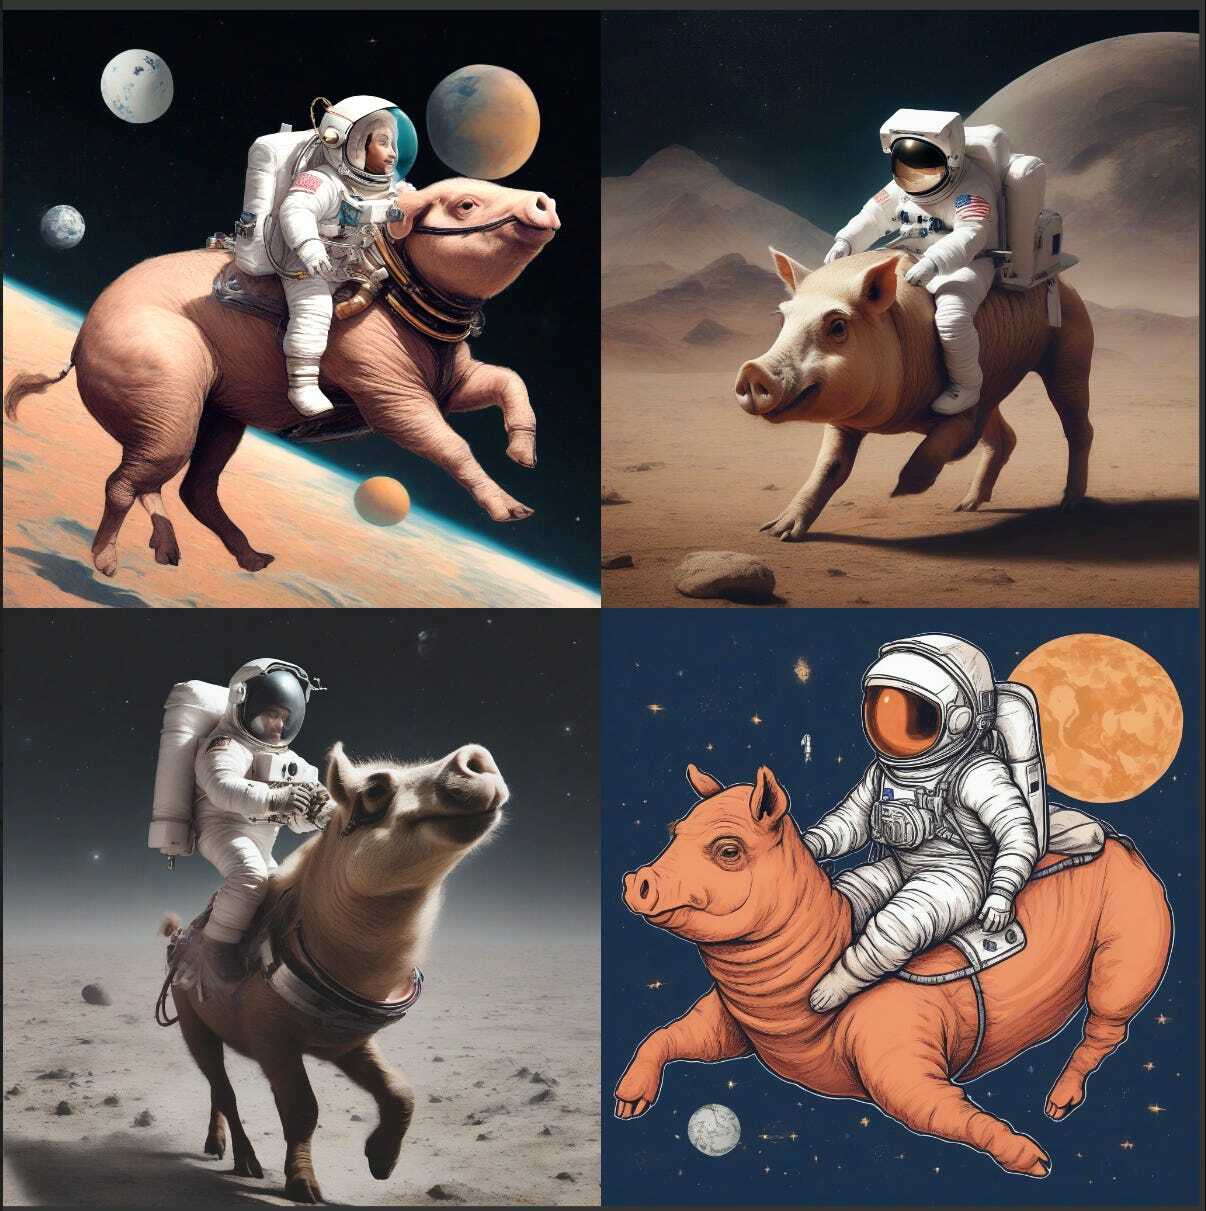
From the results, OpenCLIPViT-bigG seems more dominant in affecting the images.
Let’s try again with more aggressive differences between the two prompts:
CLIP_G input: “an astronaut riding a pig”
CLIP_L input: “Panda mad scientist mixing sparkling chemicals, artstation.”
Let’s try again with more aggressive differences between the two prompts:
CLIP_G input: “an astronaut riding a pig”
CLIP_L input: “Panda mad scientist mixing sparkling chemicals, artstation.”
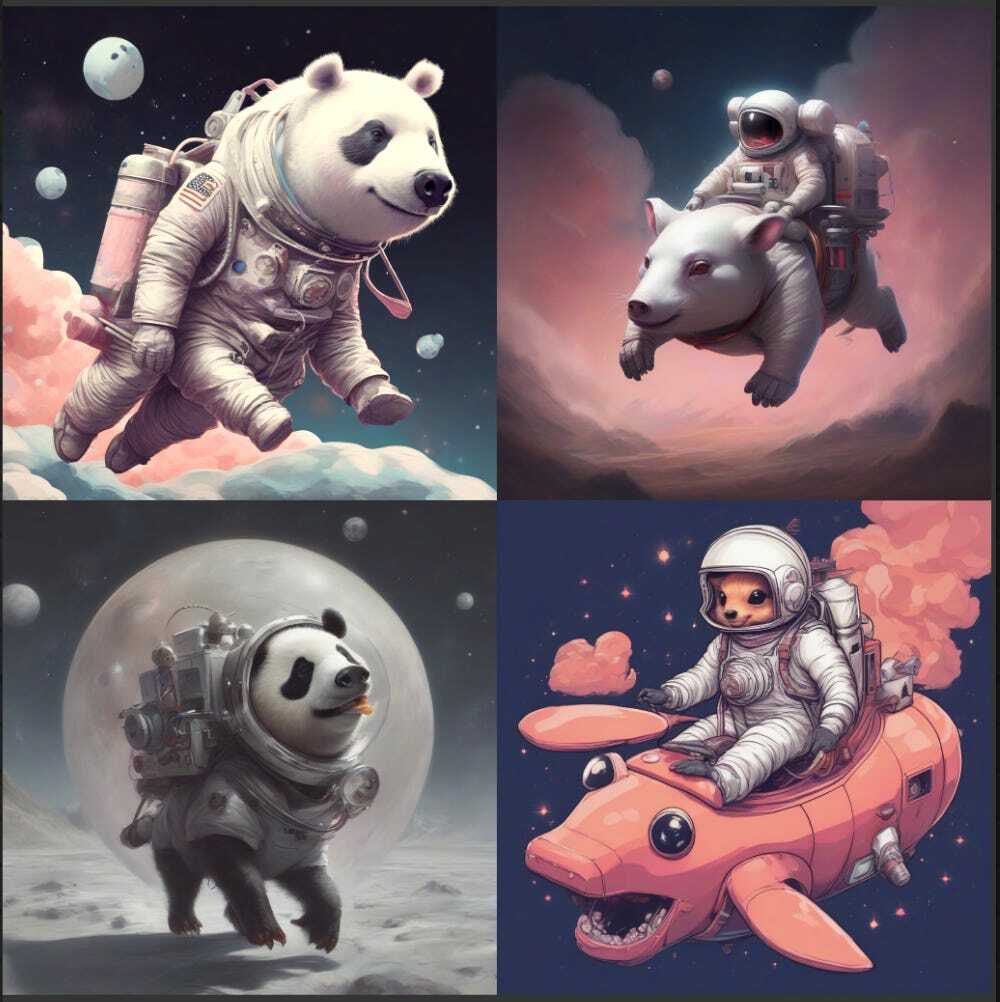
First of all, this mix looks cool. And there is once again a lot more from CLIP_G; it’s mostly astronaut themed, but there is also a bit of panda in there.
Streamlining Prompt Input Process
We learned from these experiments that there is no reason to enter each positive and negative prompt twice (for CLIP_G and CLIP_L separately). So we will optimize our workflow accordingly.
As the first step, we will turn text entry widgets into input slots on our text encoding nodes. Do this for positive and negative nodes. Right-click on the node and press “Convert text_g to input” and “Convert text_l to input”.
Now we have four new left-hand side inputs, two on each encoding node. Left-click one of these new slots, drag it onto canvas and select add node > utils > Primitive. A text input node will appear. Rename it to “Positive Prompt” and ensure it is connected to both text_g and text_l slots. Then repeat this for the negative node.
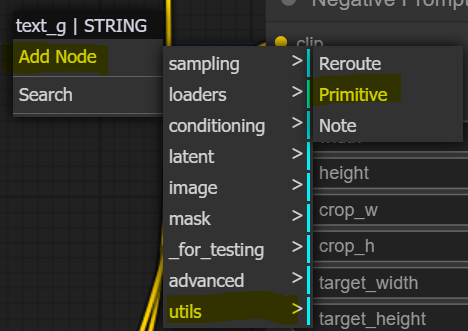
In the end, we end up with two text input nodes total instead of four so we do not have to keep pasting prompts over and over again.
Experiments with Image Size Conditioning
Our working hypothesis is that the training dataset might not be uniformly distributed - for example, most pixel art might be in 128x128 resolution, most portrait photos 512x512, and most digital illustrations 1024x1024. And since, in a way, with conditioning parameters, we are referencing back to the training dataset, does this mean that we should adjust the parameters based on the type of image we are trying to generate? Let’s do some initial testing.
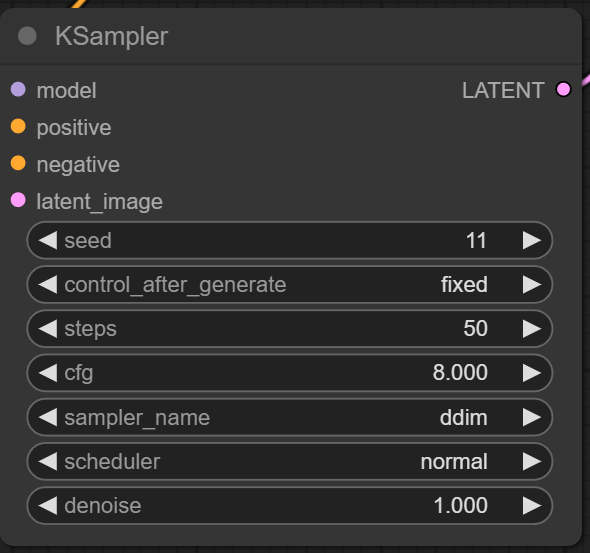
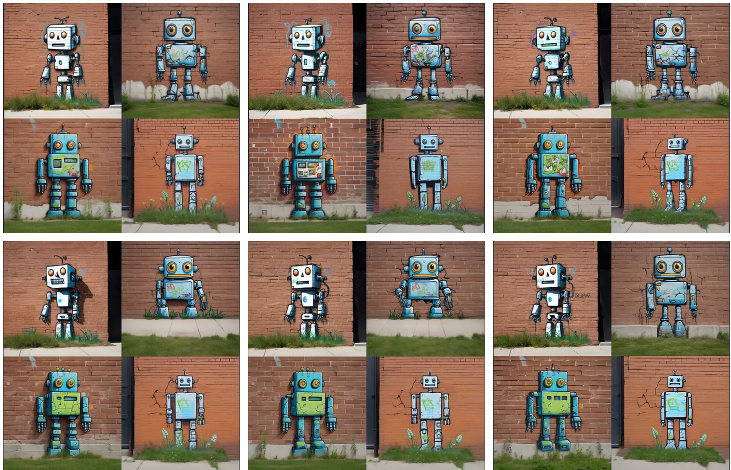
For a start, let’s try to mimic what they have done in the SDXL paper and, with the standard parameters, create new starting comparison images. They used it on the 512x512 model, and we do not know the seed number, so it will not be an exact comparison. However, we will update our sampler to DDIM, CFG to 8.0, and step counts to 50. The prompt we use: “A robot painted as graffiti on a brick wall. a sidewalk is in front of the wall, and the grass is growing out of cracks in the concrete.”

Starting Image with Size Conditioning 1024x1024
We will test 5 different values of size conditioning - four from the paper (64x64, 128x128, 256x236, 512x512), and we will add one high value of (2048x2048).
Since these are 1:1 aspect ratios, we will keep aspect ratio conditioning values to 1024x1024. Also, note that all generated images will still have a resolution of 1024x1024; we are just changing conditioning parameters.
And, if you are wondering, we changed values in both positive and negative prompt nodes - this is how they look now.
Let’s take a look at the generated images. Here is all 6 generations with 4 images each:
Note: All images are uploaded in full size on HuggingFace (link).
And zoom into the first image only across all generations:
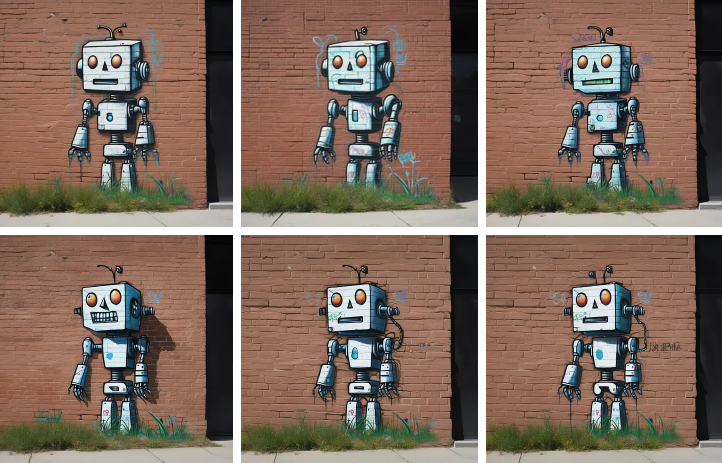
We noticed a few very interesting things that might be worth further attention. First of all, 64x and 128x generations are objectively blurry. Then we see the first jump in quality at 256x and another improvement at 512x. From there, it’s arguable, and one can say that 1024x has slightly fewer details than 512x. Finally, 2048x looks almost identical to 1024.
Let’s redo the experiment with realistic photography. In this case, we will do just four conditioning sizes, 64, 256, 512, and 1024.
Let’s redo the experiment with realistic photography. In this case, we will do just four conditioning sizes, 64, 256, 512, and 1024.
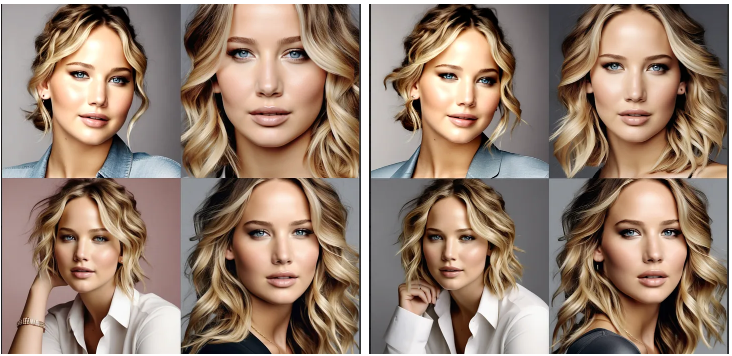
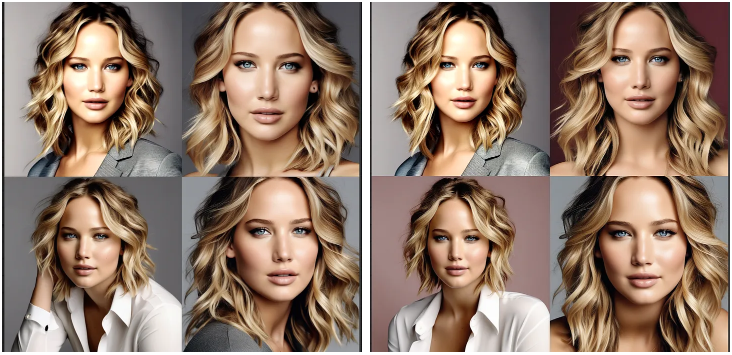
The results are not clearly conclusive once again. 512x and 1024x generations are definitely better than others, but between the two, there are clear differences but not a clear winner.
Experiments with Cropping Parameters
We think that it makes sense that (0,0) would be the best value here, so we will keep the scope minimal here and compare (0,0) to (512,0), and ideally, we should see the top part of the image chopped off in the latter. Note that the paper uses the (c top,c left) to denote crop values. In a way, beyond using the optimal values, this could almost give us a little bit of angle/perspective control for a very specific generation.
Everything went as expected, so there is probably not much more to discuss here. Just use 0,0 as a default.
Experiments with Aspect Ratio Conditioning
Here we have one main hypothesis: matching the conditioning parameter aspect ratio to the intended aspect ratio of the image will improve image quality.
Meantime, we also have a question about image size conditioning and aspect ratio conditioning values. Should they be synchronized, or might they be decoupled, and using more common values for image size might give better outcomes? We will do very light testing on this here.
Our Midjourney post (link) shows that 2:3 is the most popular aspect ratio. Note that Midjourney uses width:height values. In the SDXL report, we see the list of the supported aspect ratios, which use Height x Width values; we do not see the 1.5 aspect ratio. The closest commonly used value is 1.67, so we will generate images with 1280 height x 768 width resolution.
The first generation will have a target width and height of 1024x1024, while the second will match 1280 x 768. In both cases, the width and height conditioning values are set to 1024 x 1024. For the third, and final image, aspect ratio and size condition values are set to the target image size.

thx substack for chopping faces off. It's there, just click it
Overall, the impact is minimal, and it is hard to draw definitive conclusions. It is probably worth keeping these aspects in mind and experimenting to agree on the optimal combinations of the values.
Final Workflow Optimizations
It is a long post, but with the results of the experiments, we can implement a few changes to our workflow to keep it a little cleaner. This will be important as in part 3; we will add an SDXL refiner, which almost doubles the workflow complexity and size.
There is no reason why conditioning values will differ in positive and negative prompt encoding nodes, so we should streamline this.
So overall, we will change 12 input widgets into 6. Let’s start with converting all widgets on Encoding nodes to inputs. Right-click on the note, press “Convert width to input,” and repeat this until everything is converted on both negative and positive ones. In the end, this is what we are left with:
Now let’s start with the positive prompt encoding node, right-click on the width slot, drag it onto canvas, and select Add Node > utils primitive. Repeat this six times for each unconnected slot on the positive prompt node. Make sure to rename them so that we know what we are dealing with and connect each to the Negative Prompt encoding node.
In the end, our spaghetti looks something like this. Despite many connections, we believe this should be understandable if you followed the post. We can do some style work for clarity, but let’s save that for later after implementing the SDXL refiner.
In the end, our spaghetti looks something like this. Despite many connections, we believe this should be understandable if you followed the post. We can do some style work for clarity, but let’s save that for later after implementing the SDXL refiner.

And if you want to load it from an image, here is the one generated with this updated flow. (direct link)

