Hello, FollowFox community!
TLDR: We are launching Vodka_V1 by FollowFox.AI, a general-purpose model fine-tuned on Midjourney V5 images, and in this post, we are sharing all the details on how we created it. Our initial version is already quite fun to work with, and thus we decided to release it. We want to continue experimentation here, so please share your feedback and expect further improvements.
Check it out on CivitAI (link)
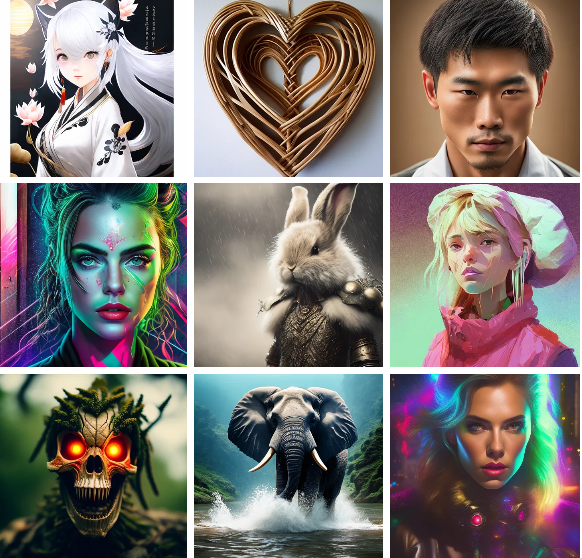
A few examples
Today we are starting a new series where we will start fine-tuning a general-purpose Stable Diffusion model. The goal is to put something together that achieves high quality and flexibility, is easy to prompt, and is worth having in your Stable Diffusion toolkit.
Along with the start of the series, we will release the V1 of the model for all of you to test.
And most importantly, we will share every part and step of the journey with you. We hope this gives you some ideas and a starting point to replicate something similar. We also hope to get feedback and suggestions for improvement in the next posts. And collectively, as a community, build upon the knowledge and experiences of each other.
The Plan
Even though we have been fine-tuning hundreds of SD models, we have concentrated on specific goals for each model. Thus, training a general-purpose model is relatively new for us. Pair that with the fact that the best custom model creators rarely share details of their processes (please point us to any if you have seen good resources), and we are starting with a lot of uncertainty.
And when we have a lot of uncertainty at the start of a training task, we set ourselves one main goal: just put together a model as soon as possible. This will help us understand if we are at all close to the desired results, the areas that need improvement, and where to go from here. So today, we will assemble our quick, “lazy” v1 of our model, Vodka (why we chose this name will soon be understood). To do this, we had to take a few main steps:
- Find a set of images that we will fine-tune the base model on;
- Clean the data and prepare captions that will be used for the training;
- Decide on the training protocol (tools, parameters, resources);
- Fine-tune the model;
- Test the results;
- Based on findings, generate hypotheses and keep iterating.
In this post, we will concentrate on steps 1-5, and based on the interest levels, we will continue from step 6 in the next ones.
1 - Choosing Training Images
There are a lot of options here, ranging from our internal datasets to publicly available ones. For this first run, we are leveraging on our past learnings to enhance the finetuning process.
In previous posts, we found that synthetic/AI-generated images train Stable diffusion models faster (link). So we wondered if “distilling” AI-generated images into our model could be a faster way to get a high-quality checkpoint — which led to our model’s fancy name: FollowFox Vodka. (Stay tuned for lots of other hard liquor-inspired models coming out soon from our stills.)
When it comes to synthetic images, Midjourney v5 stands out as generating consistently good quality results, so we decided to use it as our source model.
There are plenty of ways to find or compile a dataset of Midjourney-generated images, so we won’t be diving into that. Discord channels are scrapeable — people have been scraping them for years now —, and MJ happens to have quite a few open channels on Discord. Even though most MidJourney power users are not generating images in public channels, there still is a good amount of decent-quality open channels. Should you be interested in doing it yourself, this tool called DiscordChatExporter (link) might be useful for you, and the knowledge that Version 5 of MJ was released on March 15th can also be useful.
With some effort on our end, we created a dataset of CSV files with just under 4GB containing prompts, image links, and other details on the generated images, which we are making fully available on Kaggle: link.
Of course, you still need to download and caption those images, and you can read about those steps in the next section.
2 - Cleaning the Data and Preparing Captions
Cleaning the data is a rabbit hole that can take an insane amount of time. However, we aimed to fine-tune a model as fast as possible, so we did not go too deep — which means there are plenty of opportunities to make improvements here for future iterations.
At this stage, we made a few more experimental decisions based on hypotheses that we had:
- We will use only the images that were upscaled by Midjourney users;
- We will not caption the images — instead, we will use the user prompts.
The first decision is a bet that we think is relatively safe — in a way, it introduces human feedback in our process: if a user upscaled one of the initially generated four images, it should mean they liked that version.
The second decision is more of a gamble and needs to be tested by more experiments. If we utilize the prompts used by Midjourney users, the output model could become easier to control as it would favor a prompting style that’s already already familiar for a lot of people. But this is a gamble in many ways because we don’t know how those prompt-image pairs will end up training a Stable Diffusion model (and we don’t know many details about the source model that Midjourney used).
To achieve all this, we put together a very basic Python code that did the following:
- Open all 20 CSV files into a single Pandas Dataframe and do some very basic data cleaning;
- Search the prompts that are both v5 and upscaled;
- Save these prompts in a new CSV file. You can download it from Kaggle, just 13Mbs (link);
- From that CSV files, download individual images + create .txt files with the user prompts in them.
The Python code we used here is in this Kaggle notebook, but please note that we ran this locally using Jupyter Notebooks: link.
The dataset we created contained ~5,000 text and image pairs. However, we noticed that some images had captions starting with HTTP, resulting from our lazy data cleaning — we used some of the Image2Image workflow results. So to keep things simple, we deleted all of such images and ended up with 4,000 images.

A bit more data cleaning and analysis would be nice here to understand what this dataset contains — if it over indexes on certain subjects, topics, or prompt styles —, but all that’s for the future iterations. For now, we had a starting dataset that looked decent from a quick visual inspection!
And, of course, you can download the input data we used, this time from Google Drive, as Kaggle gave us some errors (link).
3 - Training Protocol
Our training tool, in this case, is EveryDream 2.0 (link). They have pretty good documentation on how to get started on that link, or you can also check one our earlier posts when we did the first tests with the tool (link).
Key decisions on the training parameters (we used SD1.5 as a base):
- The constant learning rate of 5e-07
- 100 epochs total, saving a checkpoint every 25 epochs
- Zero frequency ratio set to 0.01
- We decided to use 15% of the data as a validation set
And in case you want to copy the exact settings, here are the full parameters:
—train.json parameters:
{
  "config": "train.json",
  "amp": false,
  "batch_size": 4,
  "ckpt_every_n_minutes": null,
  "clip_grad_norm": null,
  "clip_skip": 0,
  "cond_dropout": 0.04,
  "data_root": "D:\\ED2\\EveryDream2trainer\\input\\v5_test_2",
  "disable_textenc_training": false,
  "disable_xformers": false,
  "flip_p": 0.0,
  "gpuid": 0,
  "gradient_checkpointing": true,
  "grad_accum": 1,
  "logdir": "logs",
  "log_step": 1,
  "lowvram": false,
  "lr": 5e-07,
  "lr_decay_steps": 0,
  "lr_scheduler": "constant",
  "lr_warmup_steps": 0,
  "max_epochs": 100,
  "notebook": false,
  "optimizer_config": "optimizer.json",
  "project_name": "mj_v5_2",
  "resolution": 512,
  "resume_ckpt": "sd_v1-5_vae",
  "run_name": null,
  "sample_prompts": "sample_prompts.txt",
  "sample_steps": 5000000,
  "save_ckpt_dir": null,
  "save_ckpts_from_n_epochs": 0,
  "save_every_n_epochs": 25,
  "save_optimizer": false,
  "scale_lr": false,
  "seed": 555,
  "shuffle_tags": false,
  "validation_config": "validation_default.json",
  "wandb": false,
  "write_schedule": false,
  "rated_dataset": false,
  "rated_dataset_target_dropout_percent": 50,
  "zero_frequency_noise_ratio": 0.01,
  "save_full_precision": false,
  "disable_unet_training": false,
  "rated_dataset_target_dropout_rate": 50,
  "disable_amp": false,
  "useadam8bit": false
}
validation_default.json parameters:
{
    "documentation": {
        "validate_training": "If true, validate the training using a separate set of image/caption pairs, and log the results as `loss/val`. The curve will trend downwards as the model trains, then flatten and start to trend upwards as effective training finishes and the model begins to overfit the training data. Very useful for preventing overfitting, for checking if your learning rate is too low or too high, and for deciding when to stop training.",
        "val_split_mode": "Either 'automatic' or 'manual', ignored if validate_training is false. 'automatic' val_split_mode picks a random subset of the training set (the number of items is controlled by val_split_proportion) and removes them from training to use as a validation set. 'manual' val_split_mode lets you provide your own folder of validation items (images+captions), specified using 'val_data_root'.",
        "val_split_proportion": "For 'automatic' val_split_mode, how much of the train dataset that should be removed to use for validation. Typical values are 0.15-0.2 (15-20% of the total dataset). Higher is more accurate but slower.",
        "val_data_root": "For 'manual' val_split_mode, the path to a folder containing validation items.",
        "stabilize_training_loss": "If true, stabilize the train loss curves for `loss/epoch` and `loss/log step` by re-calculating training loss with a fixed random seed, and log the results as `loss/train-stabilized`. This more clearly shows the training progress, but it is not enough alone to tell you if you're overfitting.",
        "stabilize_split_proportion": "For stabilize_training_loss, the proportion of the train dataset to overlap for stabilizing the train loss graph. Typical values are 0.15-0.2 (15-20% of the total dataset). Higher is more accurate but slower.",
        "every_n_epochs": "How often to run validation (1=every epoch).",
        "seed": "The seed to use when running validation and stabilization passes."
    },
    "validate_training": true,
    "val_split_mode": "automatic",
    "val_data_root": null,
    "val_split_proportion": 0.15,
    "stabilize_training_loss": true,
    "stabilize_split_proportion": 0.15,
    "every_n_epochs": 1,
    "seed": 555
}
optimizer.json parameters:
{
    "doc": {
        "optimizer": "adamw, adamw8bit, lion",
        "optimizer_desc": "'adamw' in standard 32bit, 'adamw8bit' is bitsandbytes, 'lion' is lucidrains",
        "lr": "learning rate, if null wil use CLI or main JSON config value",
        "betas": "exponential decay rates for the moment estimates",
        "epsilon": "value added to denominator for numerical stability, unused for lion",
        "weight_decay": "weight decay (L2 penalty)",
        "text_encoder_lr_scale": "scale the text encoder LR relative to the Unet LR. for example, if `lr` is 2e-6 and `text_encoder_lr_scale` is 0.5, the text encoder's LR will be set to `1e-6`."
    },
    "optimizer": "adamw8bit",
    "lr": 1e-6,
    "betas": [0.9, 0.999],
    "epsilon": 1e-8,
    "weight_decay": 0.010,
    "text_encoder_lr_scale": 1.0
}
4 - Fine-tuning the model
We did the training on a local machine using RTX3090 GPU. You can do the same or use cloud options that are well-documented in the EveryDream2 repository.
The 100 epochs translated into 86,400 training steps. The whole training took ~20.1 hours to finish.
The training loss was continuously and steadily going down throughout the training, as usual:

Validation loss is a bit more interesting; after ~25% of the training, most of the loss decline was done, then we observe a long period of loss staying stable, and then the loss values slowly going up after ~60% of the training process. 50% roughly looks like a low point, but it’s hard to make any deeper conclusions based on the graph without a deeper understanding of our dataset that we lack for now:

All the other graphs from the training loss seemed normal, and nothing particularly interesting stood out.
5 - Testing the models
For tests, we had a few things in mind:
- Do some quick checks to see if we got anything remotely promising;
- Compare different epoch checkpoints to decide which one is better;
- Discover combinations of parameters that work well.
Quick Tests
We loaded the 50 epoch checkpoint given the validation graph for the initial tests:
For a start, we tried three short prompts at random seeds, CFG, and steps. Prompts used: “futuristic city,” “cyborg robot fox,” and “beautiful woman.”

short prompts
Then we tried a couple of prompts from the training data:

Prompts from Training data
And finally, high quality, Stable Diffusion style prompts negative parts that were copied from Civitai generations:

longer prompts
So far, the results seemed interesting enough to continue testing.
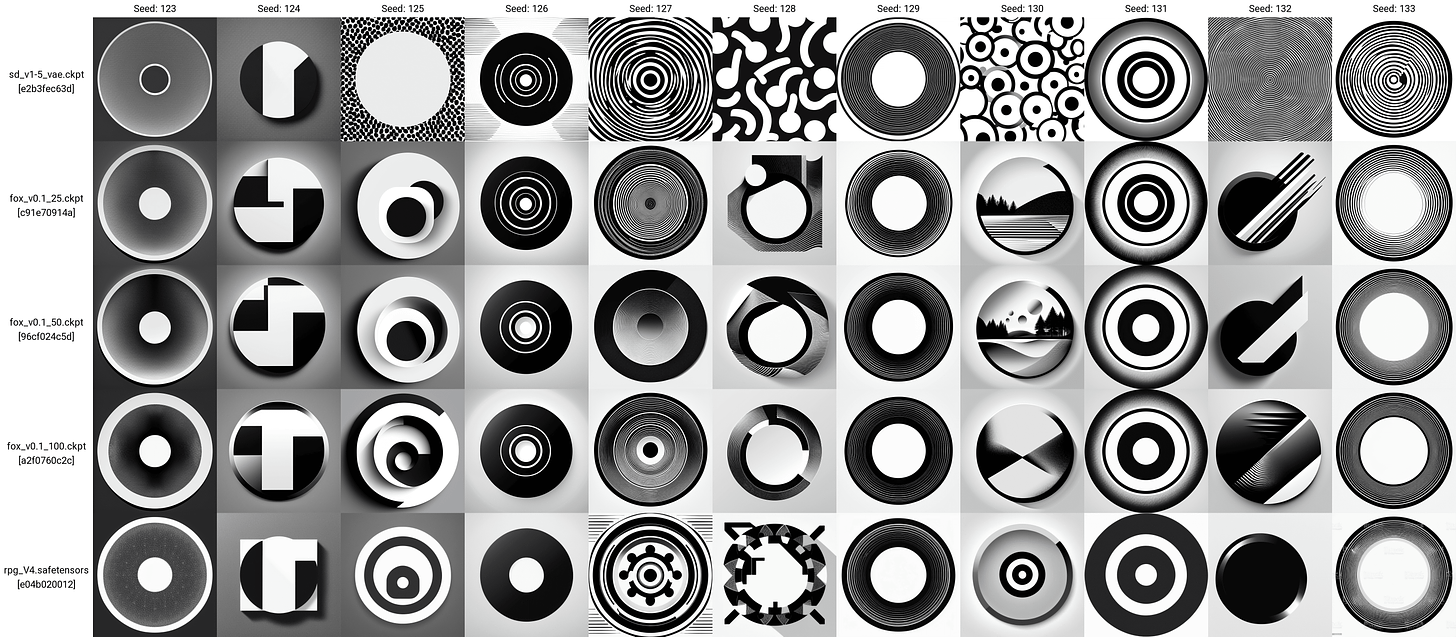
Comparing Different Epochs
We did a few tests on this front, including those following this great post of ED2 community member u/alexds9 (that post deserves a lot more attention and experimentation from us, by the way). For example, in this test, it was very interesting to observe how circles are improving over time as the training goes on:
And then we did a few more examples from the Reddit post:

We knew we had to choose between 25 and 50 epochs, so we did a few more tests. We won’t share those in this already long post, but the two were reacting to prompts extremely similarly, but 50 epochs seemed to look a bit more fried in some cases.
So we decided that we will be releasing the 25 epoch model!
Parameters that work well
Once again a lot of testing that looks quite similar, so we won’t post a bunch of those images, but here are a few takes:
- CFG ranging from 3-6 work well. For realistic human generations, lower CFG works much better, indicating over-training. For more creative generations where realism is not needed, a CFG value of 7 also works well.
- Low step counts (0-30) seem to generate less interesting results, but starting from 40 and to 150, everything seems equally worthy.
- If a prompt is overly lengthy, lower CFG values seem better, or otherwise, images look fried.
- Almost all samplers seem to generate interesting results.
Conclusions and Next Steps
Given this is the very first version, we would call this a success. But there is a lot to improve, and the model has a few clear problems: it feels a bit fried and struggles with photorealism. But at the same time, it can generate tons of really fun pictures that are on the level of some of the best available models today.
There is a ton to try and improve from here, from a few long-hanging fruits, such as lowering the learning rate to make the model less fried to experimenting with captioning images, segmenting by different classes and weighing them by the current weakness, cleaning the dataset, using more advanced training protocols, so on and so on.
For now, we will release the model and observe what happens. If we see some traction and interest, we will continue iterating. So please share your thoughts with us!
