Hello, FollowFox community!
Check out Vodka V3 on Civitai link
Our Vodka series has been quite popular (both - the models and the posts). What’s more, we found doing experiments on them quite useful, and we have been learning a lot.
We decided to double down and continue this exploration. In this post, we will try to add specific tags to our training data to explore if that can improve the quality.
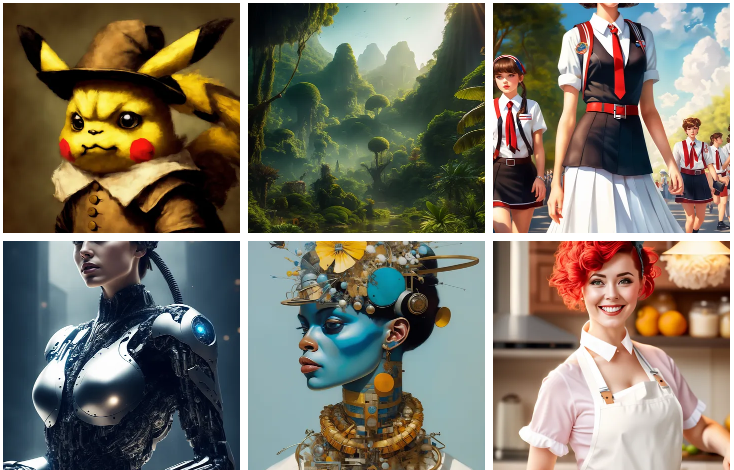
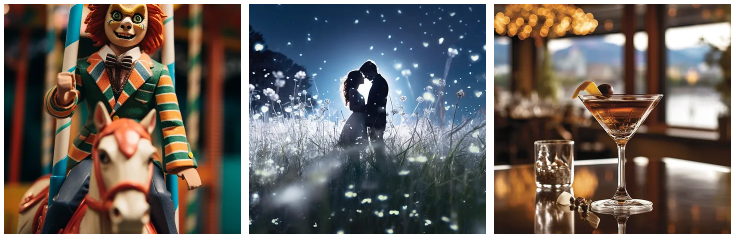
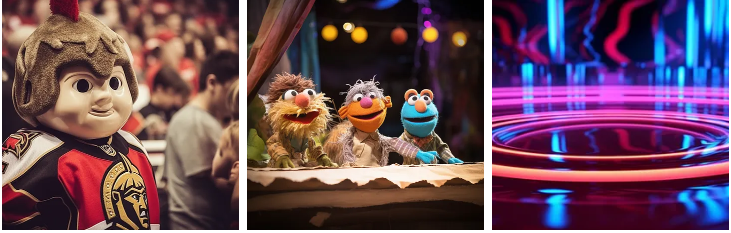
V3 Showcase
Additionally, for the first time, we have a roadmap for this series for you to know what to expect.
Upcoming Roadmap
Vodka Series:
- Vodka V3 (complete) - adding tags to captions to see their impact
- Vodka V4 (in progress) - addressing the ‘frying’ issue by decoupling UNET and Text Encoder training parameters
- Vodka V5 (data preparation stage) - training with a new improved dataset and all prior learnings
- Vodka V6 (TBD) - re-captioning the whole data to see the impact of using AI-generated captions vs. original user prompts
- Vodka V7+, for now, is a parking lot for a bunch of ideas, from segmenting datasets and adjusting parameters accordingly to fine-tuning VAE, adding specific additional data based on model weaknesses, and so on.
Cocktail Series:
These models will be our mixes based on Vodka (or other future base models).
- Bloody Mary V1 (complete, unreleased) - Our first mix is based on Vodka V2. Stay tuned for this: Vodka V2 evolved from generating good images with the proper effort to a model where most generations are very high quality. The model is quite flexible and interesting.
- Bloody Mary V2+ (planned): nothing concrete for now except for ideas based on what we learned from V1 and improvements in Vodka base models.
- Other cocktails (TBD) - we have plans and ideas to prepare other cocktails but nothing is worth sharing for now.
LORAs, Textual Inversions, and other add-ons:
We have started a few explorations on add-on type releases to boost the capabilities of our Vodka and Cocktail series, so stay tuned for them.
Please note that we will share the posts on these explorations regardless of the success. Some will likely fail, but most importantly, we will learn from the process.
Full User Experiences and Solutions:
This is just the first hint on some of our upcoming releases. We are working on translating some of our accumulated experience and our vision into full release products. Stay tuned as we will be sharing more and more about some of our most exciting projects!
About Vodka V3 and What to Expect
To set expectations right away, we added a subset of WD14 captions to all of our images at the beginning of those captions. We also increased our learning rate by 50%, leaving everything else as in V2.
As a result, we got an interesting model that was reacting to those additional tags. It was similar to V2 but could react to those tags. In some cases, V3 outperforms V2, but there are generations where V2 results look better.
Unfortunately, increasing the LR rate resulted in a slightly more fried look. The V2 overall felt slightly undertrained (confirmed by the loss graph), thus the decision to increase LR. However, the model acquired this “cooked” look very early in training, and while it didn’t get worse over additional epochs, the issue is there. It is not a massive problem for most generations but is noticeable in certain cases.
In the end, we mixed V3 initial model with a combo of V1 and V2 (details below). The resulting model is interesting and objectively slightly improved over the V2.
This post shares all the details, data, code, and intermediate checkpoints.
Hypothesis on Tags and The Plan
Hypothesis
One of the main issues that we had with the V2 model was its acquired blurriness and washed-out details. So we decided to try and address it.
The first step to deciding how to address it was to find the cause. And very soon, we had a leading hypothesis - it was the problem caused by the training data.
As you know, Vodka V2 was fine-tuned on MidJourney V5.1 data. And when looking closely, we see that many images from that dataset have blurriness. We are sure that MidJourney does some post-processing on generated images before displaying them to users, and things like Bokeh effects add a lot of blurriness. Let’s take a look at an example:
While the central part of the image is not the sharpest itself, it is acceptable. But everything outside of that central focal point is washed out. We suspect this surrounding blurriness bleeds in the overall model during our fine-tuning process.
How to address it?
We had a few ideas about what can be done. First of all, regardless of what we do, we need to be able to detect these blurry images. Once detected, we had a few options.
The simplest option is to remove these images. But we do not like reducing our dataset, especially since many of these images look quite impressive.
Another option is to crop images to their central part. Still, the approach seemed unpredictable and partially addressed the issue since blurry parts will be reduced but not entirely removed.
Finally, we thought to add tags in image captions indicating that these images are blurry so that SD can recognize them, and by not using these tags in prompting or even including them in negative prompts, we could improve the output quality.
The Plan
We decided to use a so-called tagger to detect blurriness and then add appropriate tags. We had a few options here and chose the simplest of the three - using a subset of Booru tags using the WD14 tagger. The other options were using CLIP tags or even creating our custom tagger.
On top of tags indicating the blurriness of the image, we decided to add a few more interesting ones to see how the model will react to them.
The tags were added at the beginning of the image captions. Note that this is likely not the optimal approach, but we wanted to highlight their impact, and placing them at the start will amplify that impact.
As mentioned, we adjusted the learning rate and left everything else unchanged.
Tagging the Images
Overview of the Tagger
As mentioned before, we will be using the so-called WD14 tagger. It is an image-to-text model created and maintained by MrSmilingWolf. This model was used to train Waifu Diffusion.
Essentially it is a model that takes an image as an input, then has a long list of all potential tags that it can use, and predicts a probability that this image matches the tag for each tag.
Taking a look at MrSmilingWolf’s HuggingFace reveals that there are a bunch of different versions of the WD14 tagger. We compared a few of them, and they all seem to have the same tags list; the performance is different.
On performance on WD Discord (link to the quote), we saw a quote from the author and decided to use the convnextv2 (link) version since it promised high performance, and we had high hopes for our 3090.
SwinV2: a memory and GPU hog. Best metrics of the bunch, my model is compatible with timm weights (so it can be used on PyTorch if somebody ports it) but slooow. Good for a few predictions, would reconsider for massive tagging jobs if you're pressed for time
You can give a test to the tagger on Higgingface (link). As you can see, it generates tags across three categories: Rating (how sensitive the image is), character (to detect specific anime characters on the image), and tags (the part that we are interested in.
Preparing for Tagging - Selecting a Subset of Tags
You can see all the files and code we used for this process under the Vodka V3 Huggingface repo (link).
Our goal for these tags was very specific, so we did not require most of the tags produced by WD14. Therefore, we avoided any tags that describe the subject, pose, actions, outfit, or any other details depicted in the image. We narrowed our attention to tags that provided new and valuable insights for our image production process. Our main objective was to tackle the blurriness issue, and we sought tags to assist in this regard.
If we go to the WD14 model card files (link), we see a file called “selected_tags.csv.” This file contains a list of all possible tags that the WD14 tagger can spit out. So we had to select the ones that we cared about. In that file, we added a new column with 1s and 0s marked which tags to include and which to exclude. Since there were more than 6,900 tags, we used the 80/20 rule and filtered through the top 80% of the tags based on their count (occurrence in training).
In the end, we selected 73 tags out of 6,900. We will discuss them in detail in a bit. Here is the file with the added filtering column (link).
Preparing and Analyzing Tags
Now that we had the subset sorted, we had to generate actual tags for our images. However, we didn’t want to append these tags to the captions immediately, not before reviewing them.
We created a CSV file where we saved the generated tags for each image. In this CSV file, we also had a prediction score for each tag to look at the model’s confidence for each tag and decide specific thresholds for what to use or not.
The script that we used - link.
Output CSV file - link.
Unfortunately, we didn’t logged the time to see how long it took to tag 10k images, but it was not long, probably some number of minutes.
After a bit of data cleaning, we could analyze the generated tags. These are the most commonly added tags to our data (note a duplicated blurry tag, which we suspect is due to an added space?)
The script to analyze outputs and add tags to the captions - link.
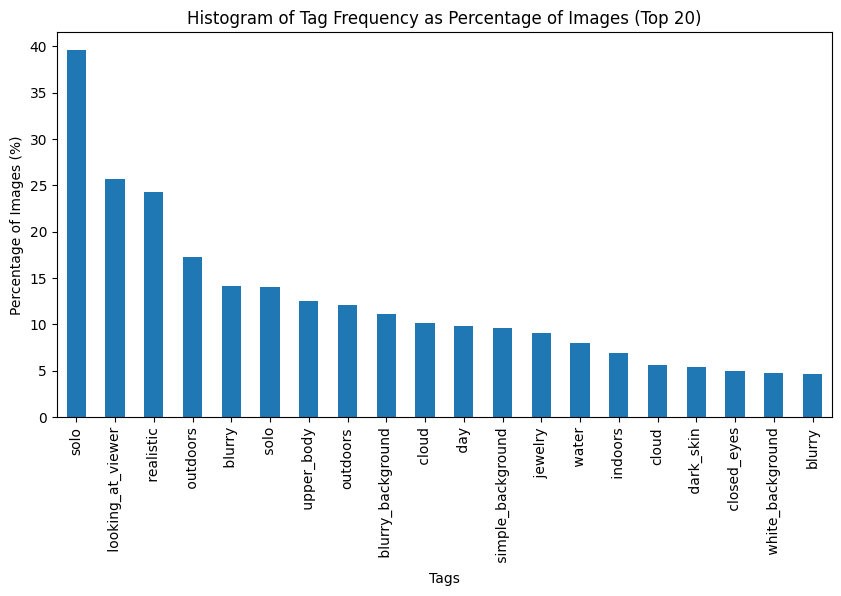
Just under 15% of the data got blurry tags added regardless of probability. To ensure it worked as intended, we bucketed tags based on their probabilities and compared some lower ones with the highest probability ones.
Let’s look at images with blurry tags with over 95% probability.
Let’s look at images with blurry tags with over 95% probability.
95%+ blurry
All three images are blurry to some degree. To the point that made us wonder if it is just better to exclude the top portion of images marked as blurry but for this experiment, we decided to keep the dataset unchanged.
Now, look at the bucket of images with probabilities between 35%-40%. In this case, we were deciding what the lower threshold should be and whether a specific tag should be included.
Now, look at the bucket of images with probabilities between 35%-40%. In this case, we were deciding what the lower threshold should be and whether a specific tag should be included.
35-40% Blurry
The images with lower probabilities were typically sharp in the center but had a lot of blurriness around them. It was tricky to make a call on the threshold since there was some blurriness in images, even with the lowest probabilities. The distribution graph of these probabilities didn’t help much either. Surprisingly, probabilities are quite evenly spread.
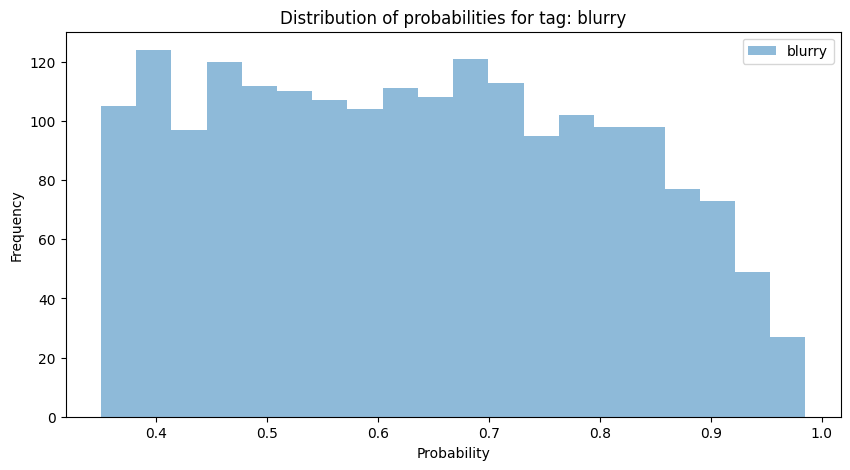
Ultimately, we added up to three tags per image with the highest probability tags while using 0.3 as the low threshold for including a tag.
The final step was to add the tags to the image captions. Before adding them, we replaced underscore symbols with spaces, and the tags were added to the beginning of the existing captions. We separated tags with commas.
Fine-tuning The Model.
Not much has changed here since V2. We had new, updated captions files and a slightly adjusted Learning Rate. As before, we trained the model for 100 epochs, saving a checkpoint every 25.
The training parameter JSON files and the logs are under this link.
Testing the Results
There was a lot of testing to be done here, so let’s follow this journey. Our automated script has greatly helped save time in generating all these comparison grids (link).
Choosing Between the Four Checkpoints
All four initial checkpoints (link).
The first step after the training is to choose the best one from the different checkpoints. We like to benchmark the results vs. older runs or other models, but doing it with all four checkpoints becomes very distracting.
We generated 20 image grids with all four checkpoints and compared them. We chose the checkpoint from Epoch 75, as it seemed to have the best balance between consistency, ability to follow prompts, not looking too ‘over-cooked,’ and flexibility across domains.
You can find all the comparison grids here (link).
Mixing With the Previous Generations
We have mixed feelings about this step, but it makes a difference, and since we are only mixing our pure Vodka distillation, we think it’s acceptable.
At this point, we have three models to choose from, V1, V2, and a fresh 75 epoch checkpoint of the V3. To make an optimal mix, we prepared three mixes:
- V3 with V1
- V3 and V2
- and finally, the difference between V1 and V2 added to V3
Once again, we generated a bunch of XYZ grids to compare, and it was quite clear that the “difference between V1 and V2 added to V3” was ahead of all other models.
You can find all the comparison grids here (link).
So we had a release candidate.
Comparing V2 and the V3 release candidate
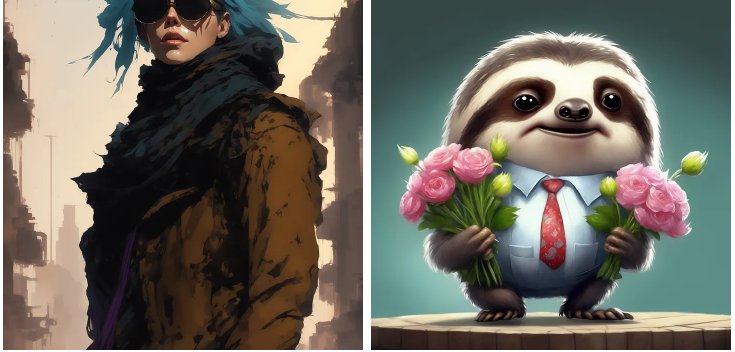
Overall the two models are very similar, but we think the V3 has a slight edge. It can now react to some booru tags, which is not bad considering their popularity in prompts. In many cases, it has a slightly better ability to follow prompts - for the first time, we even had some great outputs for the skating sloth!
And finally, blurriness and the lack of details. Did we solve the issue? No, not entirely. In some cases, it is better, but the improvement is marginal.
Check out the comparison grids here - link.
Added Tags
Let’s look at how the model reacts to some of the tags we added. We will generate a few images with just the tag and see what we get. We see many changes on these tags from the base 1.5 and V2 models.
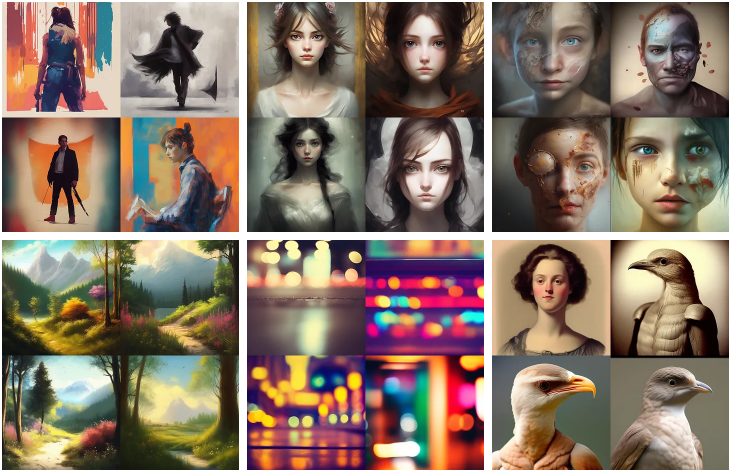
- Solo - puts one character in the generated image, works quite consistently
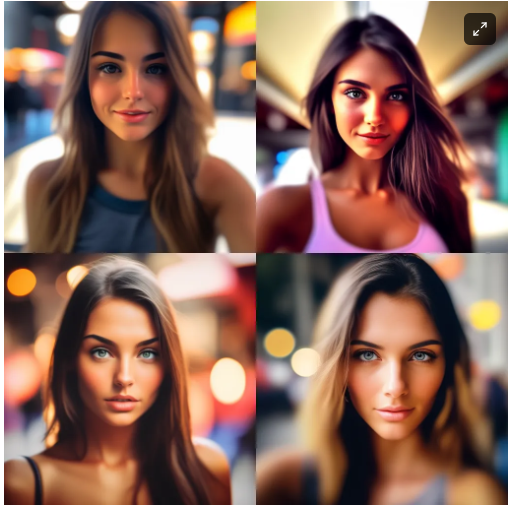
- looking at viewer - has a strong female bias but does a good job of making the character to be centered and look at the camera
- Realistic - weird results! We are getting a lot of deformities from this tag, so we recommend excluding this from the generations. This needs diagnostics and needs to be properly addressed in the future.
- outdoors - works consistently to generate an outdoor environment or place characters there.
- blurry - empty generations consistently generate blurry images. When tested as a negative prompt, it has some improvements
1st image with no negative 'blurry' prompt
- upper body - another weird one; it has a bias to generate images of birds. Needs further investigation!
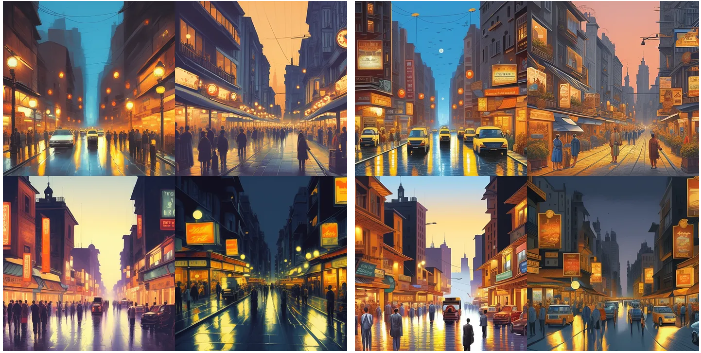
- Blurry background - works quite well to mimic the bokeh style of MidJourney. Here is an example of using it as a positive prompt
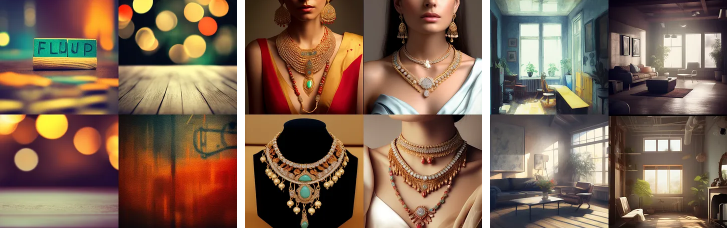
- Jewelry - generates images of jewelry or adds them to the generation
- indoors - works similarly to the outdoor prompt
Image Generation Recommendations
The model is versatile, and you can prompt it in almost any style. Whether it is MidJourney style prompts or anything from Civitai or Lexica, you should expect some interesting results in most cases.
Additionally, you can now experiment with the tags that we discussed above.
And finally, we highly recommend using some form of upscale method. Here are two of our favorites:
Hires. Fix
Enable Hires. Fix, set denoising strength between 0.3-0.5, upscale by 1.5-2x, and use Latent (nearest exact) or 4x-Ultrasharp upscaler. The rest of the parameters are quite flexible for experimentation.
ControlNet + Ultimate SD Upscale
Check the ControlNet tile upscale method from our previous post (link).
