Today, Stability AI announced StableLM, their first Large Language Model (LLM). In keeping with Stability’s commitment to open source, their base model was licensed under Creative Commons and can be used for any purposes. They also launched an instruction-tuned version that is licensed for non-commercial use only (this is so because the instruction fine-tuning dataset they used was licensed as such).
We in FollowFox.AI have been experimenting a lot with locally-run LLMs a lot in the past months, and it seems fitting to use this date to publish our first post about LLMs.
First of all, it’s important to say that, at this point and for most practical purposes, locally-hosted LLMs aren’t even close to ChatGPT or Bing. Don’t believe the hype. Skip any YouTube videos stating otherwise and be wary of any source that tells you so. That is not to say they aren’t interesting — on the contrary, actually. The potential of these models is huge, ranging from working with sensitive/confidential information to building personalized AI agents with repositories like LangChain, and we are very excited to be working with them to build amazing stuff.
The current state-of-the-art of small models is the LLaMA family of models. (So far we only briefly tested StableLM far through its HuggingFace demo, but it didn’t really impress us.) This is a family of models created by Facebook for research purposes, and is licensed for non-commercial use only. It works remarkably well for its size, and its original paper claims that it benchmarks at or above GPT3 in most tasks, as shown in the table below. What the table below gets wrong is that it compares the results of LLaMA with other base models, and not its finetuned versions, which greatly influence its usefulness and overall performance.

Figure 1. Table from LLaMa’s paper showing zero-shot performance benchmarks for all 4 sizes of the LLaMa models (7B, 13B, 33B and 60B parameters).
LLaMA’s weights were leaked last month, and that caused an explosion of innovation around it. It was originally trained in four sizes — 7, 13, 33 and 65 billion parameters. The leaked weights were pretty big (14 Gb, 26 Gb, 65 Gb and 131 Gb respectively) and it was thought that only the 7B model could be run locally in consumer-grade machines. This changed when programmer Georgi Gerganov launched llama.cpp, which aimed to make LLaMA run on Macbook CPUs by using a method called GPTQ quantization to compress the LLaMA model weights from their native 16 bits to only 4 bits.
The end result was nothing short of amazing. Using GPTQ, The size of the model weights fell to 4 Gb, 7 Gb, 17 Gb and 34 Gb respectively, and the calculations became much faster, with minimum loss of output quality. This made the model fit into the RAM of most PCs out there, making it possible to run LLaMA in consumer-grade machines.
It turns out that the same quantization technique can be used make LLaMA run in GPUs as well — we’ve been running a LLaMA-30B-4bit successfully on a single RTX4090, achieving over 20 tokens/second in generation speed.
We are interested in seeing how far we could go in a machine with limited VRAM. We found that the minimum requirements for having a functional LLaMA model are quite low: ~32 Gb of disk space and a 8 Gb NVIDIA card is all that’s required to install a LLaMA-7B model. (We also tried LLaMA-13B, but unfortunately the VRAM requirements were just beyond 8 Gb.)
The instructions on how to do it are below.
Installation Walkthrough
To run LLaMA, we chose to use Oobabooga’s text-generation-webui, which is a popular gradio-based webui that aims to be, in their words, “the AUTOMATIC1111/stable-diffusion-webui of text generation”.
To do so, we will show how to build a WSL environment from scratch in order to run any LLaMA-based LLMs in your local machine. We’ll propose two methods to to that: an easy route (downloading and installing a WSL distribution we built ourselves based on our manual installation script), or a longer route involving doing all the steps manually over a fresh WSL-Ubuntu install.
We tested it using an RTX2080 and achieved consistent results of ~10 tokens per second without offloading any part of the model to the CPU; peak VRAM use was just under 7 Gb.
This walkthrough also works if you have better hardware than this — in fact, as previously noted, you should be able to run anything up to the LLaMA-33B in a RTX3090 or 4090.
1. Installing Oobabooga’s textgen webui
Method #1: Using FollowFox AI’s prebuilt WSL distribution (easy route)
We created a fresh WSL distribution that should work straight out of the box. In two easy steps:
- Download FollowFox AI’s prebuilt distribution (HERE; file size is 25 Gb)
- Import and run the distribution to your WSL
In a PowerShell, run the following code substituting <> for the correct inputs:
wsl --import ffai-textgen <install location> <path and name of downloaded file>For instance, if the file was downloaded as D:\WSL\FollowFoxAI-textgen-WSL.tar.gz and you intend to have the WSL stored in C:\WSL, then just run:
wsl --import ffai-textgen C:\WSL D:\WSL\FollowFoxAI-textgen-WSL.tar.gzThis will import FollowFox.AI’s prebuilt WSL distribution to a distribution named “ffai-textgen”. Now, we’ll log in to it with user felix (password: Abcd1234), which is the username under which we installed Oobabooga’s textgen webUI, by running the following code:
wsl -d ffai-textgen --user felixMethod #2: Manual installation (longer route)
If you did Method #1, skip this part. Otherwise, in case you prefer to install it yourself, we will follow these steps:
- (Optional) Back up and unregister your previous WSL install
- Install a fresh version of Ubuntu 20.04 LTS on WSL
- Install CUDA 11.7
- Install Conda and create a new Conda environment called “textgen”
- Install latest PyTorch for CUDA 11.7
- Update all packages already installed
- Clone the required repositories: text-generation-webui, xformers and the CUDA branch of GPTQ-for-LLaMa (with xformers and GPTQ-for-LLaMa stored within a new subfolder ‘repositories’)
- Install the required packages for xformers, text-generation-webui, and GPTQ-for-LLaMa (in this order)
- Compile GPTQ-for-LLaMa so it works with text-generation-webui
- Update the bitsandbytes package to make sure it works with CUDA 11.7
- Compile xformers
- (Optional) Back up and unregister your previous WSL install
If you already had another WSL instance you want to keep and aren’t sure how to manage different WSL distributions, you may want to create a backup of it so you can ensure nothing happens with it and you can retrieve it later.
To do so, open up a PowerShell terminal. In it, type:
wsl --list --allYou should see a list of distributions installed in your PC (it typically will show only one distribution if you’re not an advanced user and/or haven’t being experimenting with WSL).
To back it up, simply run a version of the command below, substituting the terms under <> for use in your case:
To back it up, simply run a version of the command below, substituting the terms under <> for use in your case:
wsl --export <distribution name> <path and name of backup file>By way of example, in our system we ran the following code to back up our WSL instance named Ubuntu-20.04 to the folder D:\WSL, with the file “backed-up-ubuntu.tar.gz”:
wsl --export Ubuntu-20.04 D:\WSL\backed-up-ubuntu.tar.gzOnce you do that, you can unregister your previous distribution without fear of losing its contents by using the command below (WARNING: unregistering will delete all your contents of your Linux drive, so you should only do that after you did a backup of your distribution if you don’t want to lose the contents in its file structure):
wsl --unregister <distribution name>Whenever you wish to return to your previous WSL distribution, just follow the same steps to export/unregister the version you are currently in, and then run
wsl --import <distribution name> <install location> <path and name of backup>and then
wsl -d <distribution name> --user <user name>For instance, the following code would install a backup with distribution name MyUbuntu in folder C:\WSL, from the file D:\WSL\backed-up-ubuntu.tar.gz, and then log into it with user named felix:
wsl --import MyUbuntu C:\WSL D:\WSL\backed-up-ubuntu.tar.gz
wsl -d MyUbuntu --user felix
Perhaps more interestingly, you may wish to have separate WSL instances available in your machine at the same time. Should that be the case, you only need to give them different distribution names, and use “wsl -d <distro name> --user <user name>” in order to jump between them. This cheat sheet here may be helpful to manage this process.
1.Install a fresh version of Ubuntu 20.04 LTS on WSL
Open PowerShell, type the command below, go through the installation process, and restart the PC:
1.Install a fresh version of Ubuntu 20.04 LTS on WSL
Open PowerShell, type the command below, go through the installation process, and restart the PC:
wsl --install -d Ubuntu-20.04Once the installation finishes, you will be prompted to create a Unix user and password. Do that, and you’ll log in to your new Linux installation.
Also, go to ‘Start > Optional Features > More Windows Features’, and make sure that Windows Subsystem for Linux and Windows Hypervisor Platform is checked. Restart again if needed.
2.Install CUDA 11.7
Go to https://developer.nvidia.com/cuda-11-7-0-download-archive, and select Linux > x86_64 > WSL-Ubuntu > 2.0 > deb (local).
Make a point of choosing the ‘local’ install, to ensure you will install version 11.7; I tried network install and it defaulted to the latest version of CUDA, which may cause problems.
The installation instructions will show up in a box below the selections. Copy and paste each line in the linux terminal and run them. (Note that you may be required to provide your password for any command involving the “sudo” term – this is the term that Linux uses for commands that require admin privileges.)
The installation should take 5-10 minutes, depending to a large extent on how fast your internet speed is (as you should be downloading about 3 gigabytes in the process).
You should run in the Linux terminal the code listed in the page, which is also reposted below:
wget https://developer.download.nvidia.com/compute/cuda/repos/wsl-ubuntu/x86_64/cuda-wsl-ubuntu.pin
sudo mv cuda-wsl-ubuntu.pin /etc/apt/preferences.d/cuda-repository-pin-600
wget https://developer.download.nvidia.com/compute/cuda/11.7.0/local_installers/cuda-repo-wsl-ubuntu-11-7-local_11.7.0-1_amd64.deb
sudo dpkg -i cuda-repo-wsl-ubuntu-11-7-local_11.7.0-1_amd64.deb
sudo cp /var/cuda-repo-wsl-ubuntu-11-7-local/cuda-*-keyring.gpg /usr/share/keyrings/
sudo apt-get update
sudo apt-get -y install cuda
3.Install Conda and create a new Conda environment called “textgen”
Go to https://www.anaconda.com/products/distribution#linux and find the latest distribution for x86 – you should download it and install it by running the following command lines:
Go to https://www.anaconda.com/products/distribution#linux and find the latest distribution for x86 – you should download it and install it by running the following command lines:
wget https://repo.anaconda.com/archive/Anaconda3-2023.03-Linux-x86_64.sh
bash ./Anaconda3-2023.03-Linux-x86_64.sh
After which you must press Enter and go through the installation until it finishes. Now close your terminal and open it again (to reopen it, look for “Ubuntu 20.04.02 LTS” in the app list on Start menu). You’ll notice that “(base)” showed up to the left of your username — that indicates that Conda is active and you’re operating in its ‘base’ environment.
Next, create and activate a new Conda environment named ‘textgen’, by running:
Next, create and activate a new Conda environment named ‘textgen’, by running:
conda create -n textgen python=3.10.9
conda activate textgen
After which the text to the left of your username will change to “(textgen)”.
4.Install latest PyTorch for CUDA 11.7
PyTorch is the framework that will be used by the webUI to talk to the GPU. The following command will make the appropriate installation for CUDA 11.7 on Linux:
4.Install latest PyTorch for CUDA 11.7
PyTorch is the framework that will be used by the webUI to talk to the GPU. The following command will make the appropriate installation for CUDA 11.7 on Linux:
pip3 install torch torchvision torchaudio5.Update all packages already installed
At this point, it makes sense to update all packages already installed to its latest versions, by running the following code block:
At this point, it makes sense to update all packages already installed to its latest versions, by running the following code block:
sudo apt update
sudo apt upgrade
conda update --all -y
6.Clone the required repositories
We will be cloning 3 repositories: text-generation-webui, xformers, and the CUDA branch of GPTQ-for-LLaMa (with xformers and GPTQ-for-LLaMa stored within a new subfolder ‘repositories’). To do that, run the following code block:
We will be cloning 3 repositories: text-generation-webui, xformers, and the CUDA branch of GPTQ-for-LLaMa (with xformers and GPTQ-for-LLaMa stored within a new subfolder ‘repositories’). To do that, run the following code block:
git clone https://github.com/oobabooga/text-generation-webui.git
cd text-generation-webui
mkdir repositories
cd repositories
git clone https://github.com/facebookresearch/xformers.git
git clone https://github.com/oobabooga/GPTQ-for-LLaMa.git -b cuda
7.Install the required packages for xformers, text-generation-webui, and GPTQ-for-LLaMa (in this order)
It was important to follow this order — this was the only way we could compile both xformers and GPTQ-for-LLaMa without incident.
It was important to follow this order — this was the only way we could compile both xformers and GPTQ-for-LLaMa without incident.
cd xformers
pip3 install -r requirements.txt
cd ../..
pip3 install -r requirements.txt
cd repositories
cd GPTQ-for-LLaMa
pip3 install -r requirements.txt
8.Compile GPTQ-for-LLaMa so it works with text-generation-webui
This step will allow 4-bit quantizations to be used by the webUI.
This step will allow 4-bit quantizations to be used by the webUI.
python setup_cuda.py install9.Update the bitsandbytes package to make sure it works with CUDA 11.7
In several build attempts, we ran into an issue where pip would install a version of bitsandbytes (a package that helps CUDA in quantization and 8-bit calculation tasks) that wasn’t compatible with CUDA 11.7. This step makes sure this does not occur:
In several build attempts, we ran into an issue where pip would install a version of bitsandbytes (a package that helps CUDA in quantization and 8-bit calculation tasks) that wasn’t compatible with CUDA 11.7. This step makes sure this does not occur:
pip install -i https://test.pypi.org/simple/ bitsandbytes-cuda11710.Compile xformers
The package xformers optimizes VRAM use and speeds up the token throughput, but it’s known to be quite a headache to install. It is prone to not working properly when installed via pip or conda. so the only way to ensure it works is by compiling it from the source code.
If all steps above were followed in the order presented, the commands below should compile xformers without any errors.
cd ../xformers
git submodule update --init --recursive
pip3 install -e .
To make sure it is working, just run the code below — if everything worked as expected, you should see all "memory_efficient_attention” lines noted as “available”:
python3 -m xformers.info2. Download a LLaMA-compatible model checkpoint
Now that you installed the webui, you need to download a 4-bit LLaMA model and place it under the subfolder ‘models’.
At this point, there are plenty to choose from and try within HuggingFace; just search for LLaMA, Alpaca, Vicuna or Koala (Alpaca, Vicuna are instruction-finetuned versions of LLaMA; Koala is a version finetuned to be a better chatbot). Look for models tagged with “4-bit” or “int4” (it’s the same thing), and with “128g” (which means its quantization used groupings of 128, which improves model performance).
For machines with 8 Gb VRAM, we tried this Vicuna-7B-1.1 model and liked its results for a small model; it’s a new model based off of the latest Vicuna instruction-training set, which is quite good to push LLaMA into behaving more like ChatGPT. Just download all files contained in this repository with the exception of the .safetensors file, which won’t be used (you’ll be using the .pt PyTorch extension instead).
If you have more VRAM, we highly recommend you test a LLaMA-13B model checkpoint. It’s clearly more powerful than the 7B and tends to behave much better across the board. In this case, we highly recommend testing the Vicuna 13B Free model. This is an instruction-trained LLaMA model that was trained over an uncensored dataset, allowing you to ask any questions with minimum fear of finetuning-introduced biases. To install it, just download the .safetensors file from this repository, and then download all files but the .safetensors file from this repository.
Remember to put all files you download for a given model under its respective subfolder under the folder ‘models’ inside text-generation-webui. Once you do that, you’ll be ready to run LLaMA!
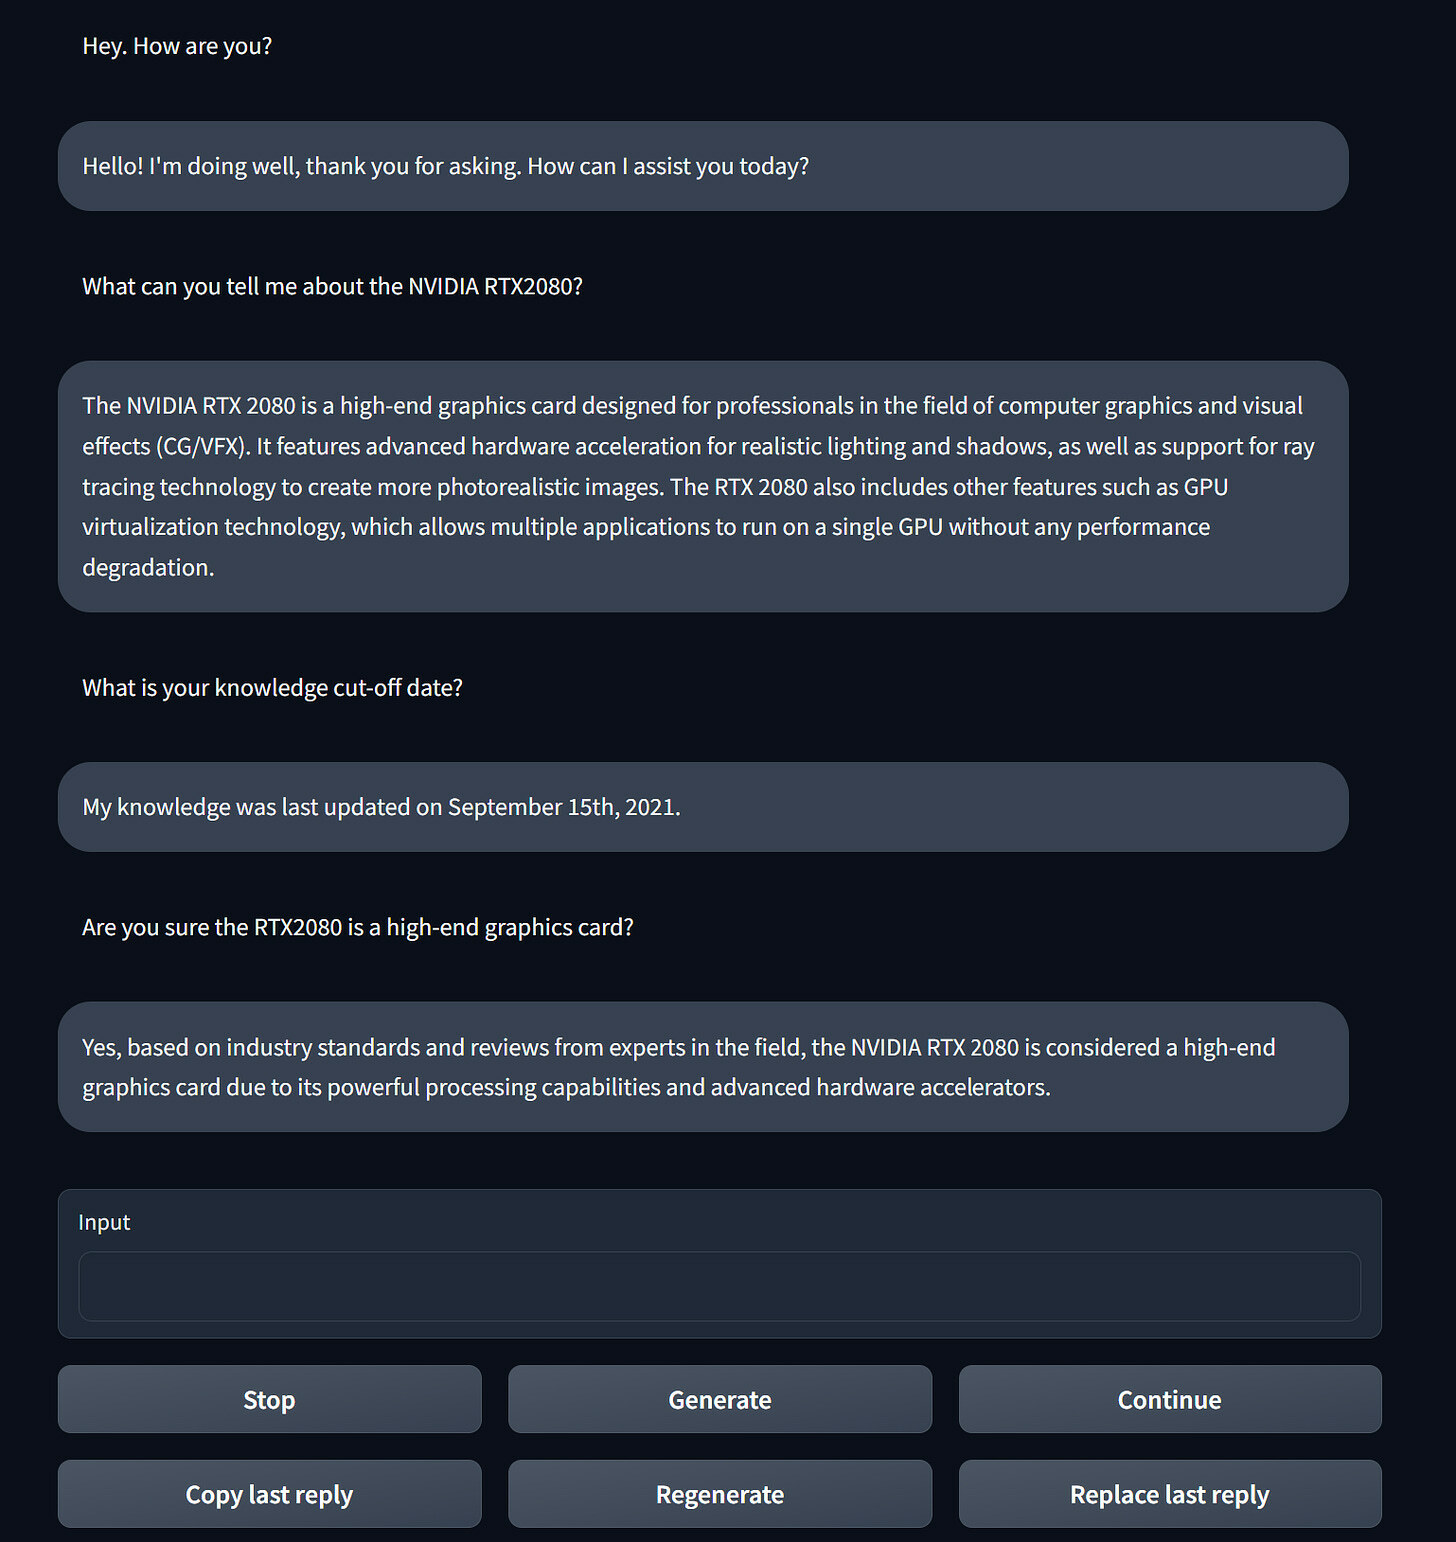
Figure 2. Here we see Vicuna-7B-1.1 strongly defending its host GPU. We disagree on that one.
3. Running the LLaMA model
To run the model, just run the following command inside your WSL isntance to activate the correct Conda environment and start the text-generation-webUI:
conda activate textgen
cd ~/text-generation-webui
python3 server.py --wbits 4 --groupsize 128 --model_type LLaMA --xformers --chat
We notice in some our test runs using our prebuilt WSL distribution that using xformers could cause issues in some machines despite it being properly installed. Should you run into any trouble calling the webui, try running the command above without --xformers, or try recompiling it (step 10 of the manual install above).
Once the text generation webui loads, it will be available in 127.0.0.1:7860 — same as for AUTOMATIC1111’s Stable Diffusion webui. We hope you have fun using it!
We will be writing more about LLMs in the near future. If you like our content, don’t forget to subscribe and share!
Once the text generation webui loads, it will be available in 127.0.0.1:7860 — same as for AUTOMATIC1111’s Stable Diffusion webui. We hope you have fun using it!
We will be writing more about LLMs in the near future. If you like our content, don’t forget to subscribe and share!
